Getting started with LSDj with Infu
Table of Contents
- 01. Requirements & Setting up
- 02. Gameboy basics
- 03. Sequencer, the basic controls
- 04. Adjusting our first sound
- 05. Understanding "Commands"
- 06. Let's make some noise in the NOISE CHANNEL!
- 07. "Well, well, well. How the turn-TABLES…"
- 08. Working with Instruments
- 09. Creating your first WAV KICK
- 10. Sound synthesis
- 11. "Can I make music now?"
- 12. Where to learn more
- 13. Credits
- 14. License (CC-BY-NC 4.0)
01. Requirements & Setting up
Quick note: You may note there is what looks like a lot of random capitalization, underlines, bold and grayed out text. This styling is so the reader can visually understand the emphasis put in explanations. The capitalization refers back to certain interfaces or functions within LSDj.
Before we start you need the following:
- A little bit of musical knowledge. This guide expects you to be somewhat familiar with how music software works, what music trackers are, what (for example) a "Kick", "Snare", "Hihat", "Bass" and such are. If you are a complete beginner, it is still a great time to play around and experiment! So you are welcome to continue reading, but might run into things that need better understanding of such musical knowledge. For the purposes of the guide we will use the term note to include semitones/half-steps. If you do not know what that means you can safely ignore this advice. I need to add that ABSOLUTELY NO MUSIC THEORY IS REQUIRED.
- To know how the hexadecimal (base 16) numbering system works. Instead of counting in the standard decimal system going from 0 to 9 before reaching 10, LSDj will be counting numbers from 0 to F (i.e. 0, 1, 2, 3, 4, 5, 6, 7, 8, 9, A, B, C, D, E, F, 10…). It's bit nerdy but in this way you can store big numbers with just 2 digits (e.g. where FF is actually 256).
- An accurate Gameboy emulator to run LSDj:
For Windows: Get the latest BGB: https://bgb.bircd.org/
For Mac: Get the latest Sameboy: https://sameboy.github.io/
For Android: Get the latest Lemuroid: Playstore link here!
As a last resort, there's also Retroarch withh Sameboy core.
- The latest LSDj rom: For this guide please visit and download the latest dev version (this guide was written based on 9.2.A). The guide may be incompatible in multiple places otherwise. The latest dev version has many more cool features we want compared to the (as of this writing) months old stable 8.5.1 version! The latest LSDj rom is otherwise downloadable from https://www.littlesounddj.com/lsd/latest/rom_images/. About Development (develop/dev) versions: Most of the time these releases provide extra cutting edge features and improvements. To check what's been added, visit the changelog on the LSDj website! Personally I use the newest development versions most of the time, though when new versions come out I recommend a good practice of giving it a week or two in case of any critical bugs. People usually report these and the developer fixes them! Also, very important when working with development versions (and in general): BACKUP OFTEN!
02. Gameboy basics
The Gameboy has 4 channels:
2 pulse channels, mostly for melodies, bass, leads, arps, or kicks/toms.
1 wave channel, which has the lowest octave, making it good for bass, kicks, and has sample playback.
1 noise channel, for hihats, snares, cymbals or noisy detuned bass.
03. Sequencer, the basic controls
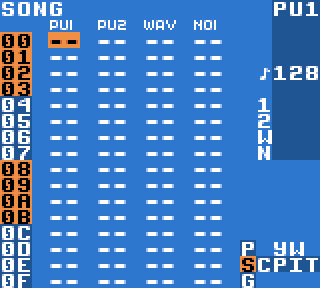
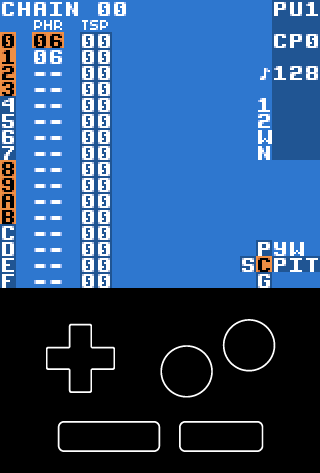
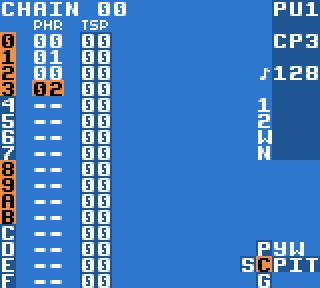
At first we see the Song screen, with 4 LSDj channels laid out in front of us, labelled on the top!
The cursor is the highlighted (orange) thingy which you can move around using the D-pad.
Here are common controls and button combos you can use to get started. Don't worry about memorizing it all, just keep it handy. We will talk about the right-hand side later!
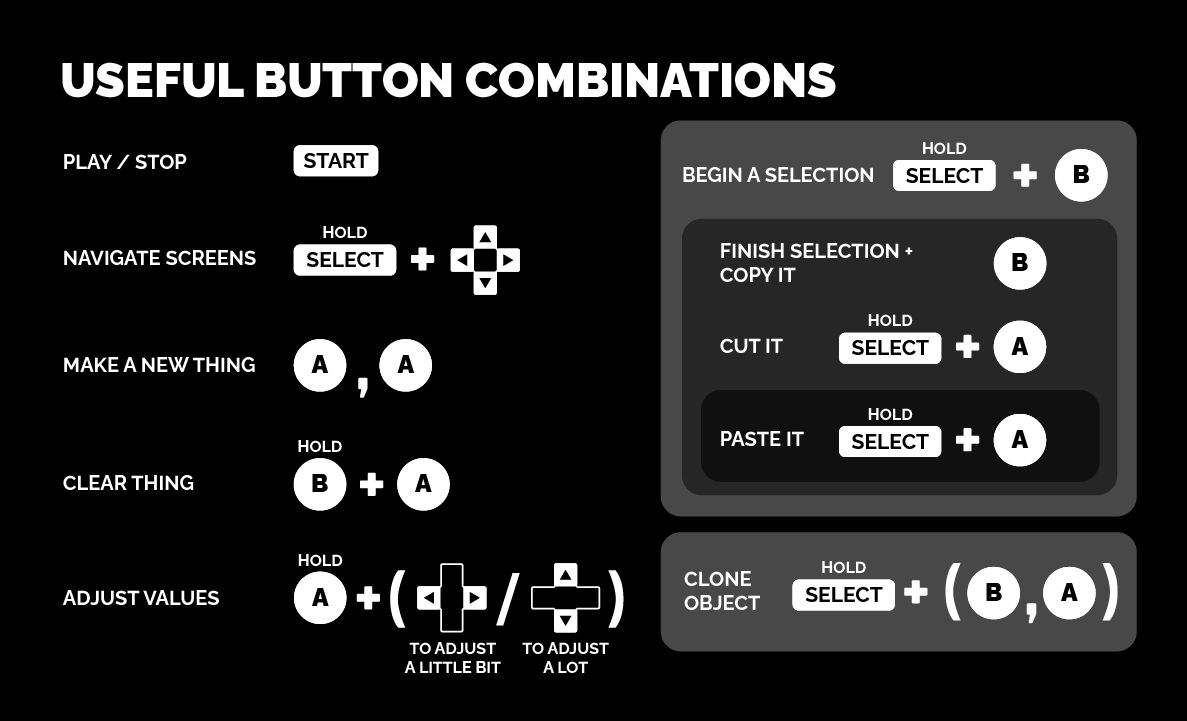
As you can see, you can switch screens using SELECT+D-pad. The bottom right of the screen shows the Navigation Map. The highlighted position is where we are right now. Some screens will 'follow' our position, keeping them close when we need them or even appearing during certain conditions!
Hover your cursor anywhere on the left side (i.e. on the PU1 column). Pressing A anywhere while on the Song screen will make Chain 00 appear right under our cursor.
"What is a Chain?"
So let me explain that in a second.
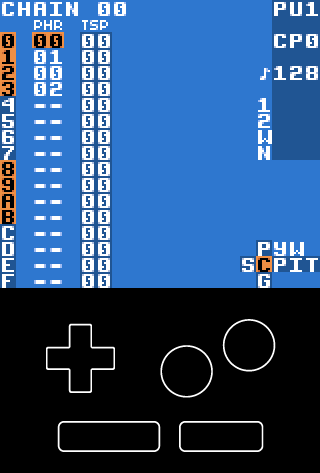
For now press SELECT+RIGHT when you have this chain (Chain 00) highlighted. It should move you inside it.
Press A again to make Phrase 00 appear. Once again go inside it by pressing SELECT+RIGHT.
The screen should look like this:
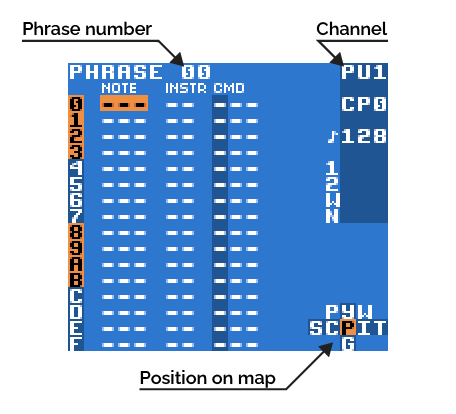
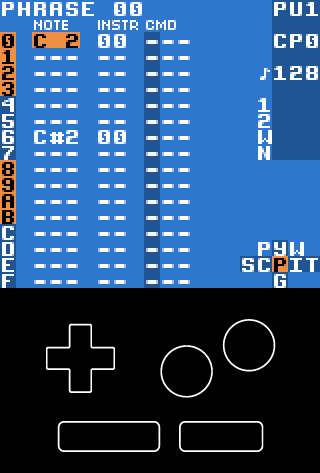
Pressing down A while the cursor is in the note column will make a note with an Instrument number appear:

Inside a Phrase screen you can fit up to 16 such notes!
"OK, so what are Chains and Phrases then?"
So a Song has 4 channels, and each channel are a collection of (up to) 191 Chains. Now think of Chains as "Music Books", and Phrases as "Music Sheets": You can place 16 steps of your notes down on the Music Sheet, and assort 16 of those sheets in a Music Book. These Music Books then get played from start to finish by one of the channels on your Gameboy!
This container system allows you to prepare longer melodies/sequences and to reuse certain parts/sections when needed! It's important to keep in mind that Phrases are shared globally. So if you place Phrase 06 in 8 different Chains and modify it anywhere, then all of them will change to match what you modified!
If that is not what you wanted to happen, you can use the "Clone" function of LSDj which allows us to easily copy certain containers to a new unique number for creating an altered Phrase. More on that later!
04. Adjusting our first sound
In our Phrase 00 place down around 3-5 notes into this Phrase. When hovering your cursor over a note, holding A and pressing LEFT/RIGHT adjusts the note by 1 note, and pressing UP/DOWN adjusts the note by 1 octave (i.e. 12 notes)!
Once you are done, pressing the START button plays your sequence. Pressing START again will stop the player.
Let's go to the Instrument screen by pressing SELECT+RIGHT:
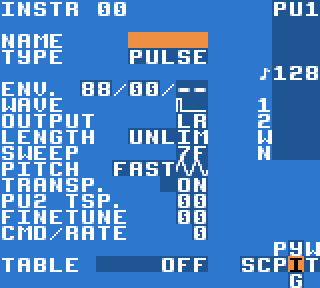
An Instrument can be any kind of sound you make in any of the channels. It may be bass, a kick drum, some arpeggios or just bleep bloops. Each mentioned would be prepared in a different way, which is what the Instrument screen will help us create!
The Type of instrument is decided by which channel you place your notes in. PULSE for the two Pulse channels, NOISE for the Noise channel, and WAVE and KIT for the Wave channel.
Quick tip: Pressing
A+Aover most of the parameters on the Instrument screen will display a brief tooltip at the top, giving some information about that parameter/setting.
The ENV. setting is pretty unusual so let me explain that below so you may get a grasp of how it works.
Volume Envelope
Pulse and Noise instruments share the same method of adjusting volume—with envelopes! You may use all 3 envelope boxes, or use just one! Let us place our cursor on the first, left most one.
Hold A and adjust the value using LEFT/RIGHT. This should change the value on the right side of the box. Press START to hear your sequence (i.e. the notes you recently placed) and start adjusting the value again.
Notice how the lower values (except for 0) make the instrument shorter, while higher values hold the notes longer. That is much like the "release" part of the instrument's sound.
Quick tip: If the notes are so long that the instrument gets cut out by the beginning of the next note, you then have notes too tight to experience the note's full range. You may have to remove these notes manually if they prevent the intended sound as they are too close to each other.
So now we know that the value on the right side of the box is the "release", what about the left value?
Adjusting the left value by holding A and pressing UP/DOWN will result in adjusting the initial volume. So the lower values create a quieter instrument, and the higher values make the instrument louder.
In summary, each envelope is made out of two parameters. The left value is volume/amplitude and the right value is the speed/time to the next upcoming volume/amplitude value!
Our 3 envelope boxes can now be understood in this representation:
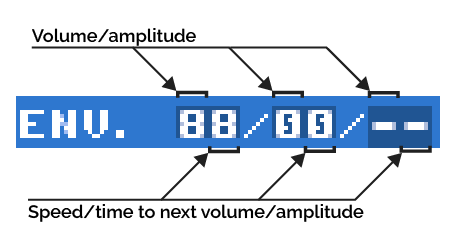
The volume goes down to 0 each time because of the volume value in the second box. This means, from the figure above, that our instrument will start at Volume 8, and with Speed 8 it will decrease to Volume 0, which is at the next envelope box!
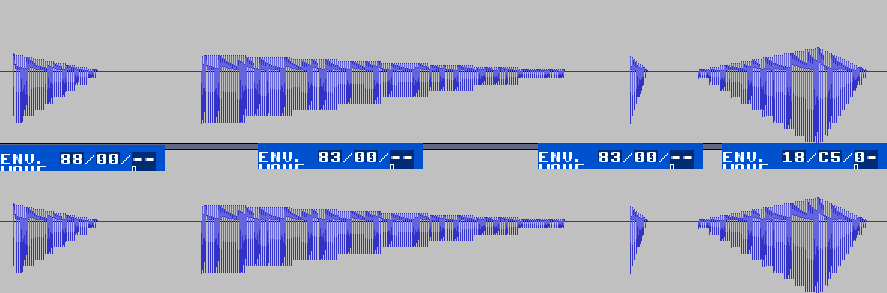
Let us look at the last waveform (i.e. [18][C5][0-]) of Figure 9.
It starts with Volume 1 and increases it's volume to Volume C at Speed 8. Once it gets to Volume C it decreases it's volume to Volume 0 at Speed 5. This means if we want to create an instrument that starts quiet and gets louder, we will need to start with Volume 0 in the first envelope box and have a higher Volume value in the next envelope box! An example would be something like [07][88][--].
If you want the sound to keep going (i.e. to sustain/hold it) then set the Speed value to Speed 0, making the instrument keep the Volume value until we interrupt it in another way!
There you go! It is quite a lot to take in, but this should allow you to shape the volume of your pulse/noise instruments however you fancy, in any number of envelope boxes you like!
"What about the rest of the Instrument screen parameters?"
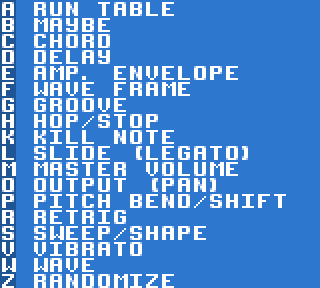
Most should be self explanatory, though if in doubt you may press A+A for a quick tip! The most confusing parameters would be SWEEP, PITCH, and TABLE. We will get to all these a bit later!
Navigating around the Chain/Phrases/sequences
So let us do some quick Phrase navigation. Visit the Chain screen and place down more Phrases. Kind of like what is done in Figure 10 below:
After a while, it becomes pretty tiresome to SELECT+RIGHT then SELECT+LEFT for each of these Phrases while you are editing. So instead, while inside any of these Phrases, you can simply scroll UP/DOWN between each of these by moving the cursor over the upper/lower edges of the phrases to move to the previous/next phrase in a chain!
How to Select, Copy and Paste
This section will show some (but not all) practical usage of these functions. So keep in mind that you can apply these methods to many different situations!
Copy/Paste an entire Phrase for creating an altered Phrase
Instead of placing new notes, scroll to your Phrase 00 where you got some notes placed. and while holding SELECT press B three (×3) times. This should highlight the entire phrase. Now without holding SELECT, press only B once. This should copy what you selected (i.e. the entire phrase) into the buffer.
Scroll down to your new and empty phrase and place your cursor where your pasted content should start. Then paste what you copied earlier by holding SELECT+A. Notice that it is the same as copying, but with A instead.
Quick tip: While using Copy/Paste/Cut actions, newer versions of LSDj will display a tooltip at the top of the screen to help inform what is happening. Still unsure? Refer to the right side of Useful Button Combinations (Figure 2). You even get a button combo for cutting selections too!
Copy/Paste a custom selection
Place the cursor at the start of your selection. Now hold SELECT+B. You are now in custom selection mode! Use your D-pad to move around and highlight a few rows of your notes and instruments. Let us go with at least two notes highlighted this way. Press B now to finish your selection and copy it to the buffer. Move your cursor a few rows below and paste (i.e. SELECT+A) what you have copied, shifting the phrase:
Boom, we now have a variation of the first phrase!
Where you press START matters!
Make sure that all phrases contain some notes for our next demonstration. Now press START at the top of the screen to start the playback!
Notice the following:
Pressing START in a Phrase screen plays only the currently viewed Phrase, and nothing else.
Pressing START in a Chain screen makes the currently viewed Chain play, which includes each phrase of that Chain.
Pressing START on the Song screen will make the whole song play the Chains that follow each other.
Extra credit: What happens if there are gaps in the Song screen? What happens if START is pressed anywhere that is not at the top of a screen? (Check near the end of this guide to know how to fill gaps in the sequencer.)05. Understanding "Commands"
Let us revisit one of your Phrase screens. The right-most CMD column is for commands. Pressing A twice on the left side (i.e. the first spot) of this column while adjusting it's value will give a quick tooltip of what that current command does. As commands start with a letter in this part of the column, they are mostly easy to familiarize with!
Put down one to two Pitchbend commands. Notice how positive ranges are from 01-7F, while negative ones go from FF-80 (where FF is the equivalent of -1). Set these to whatever values you like, though no larger than 20 values apart to avoid a laserbeam sounding quality 😉
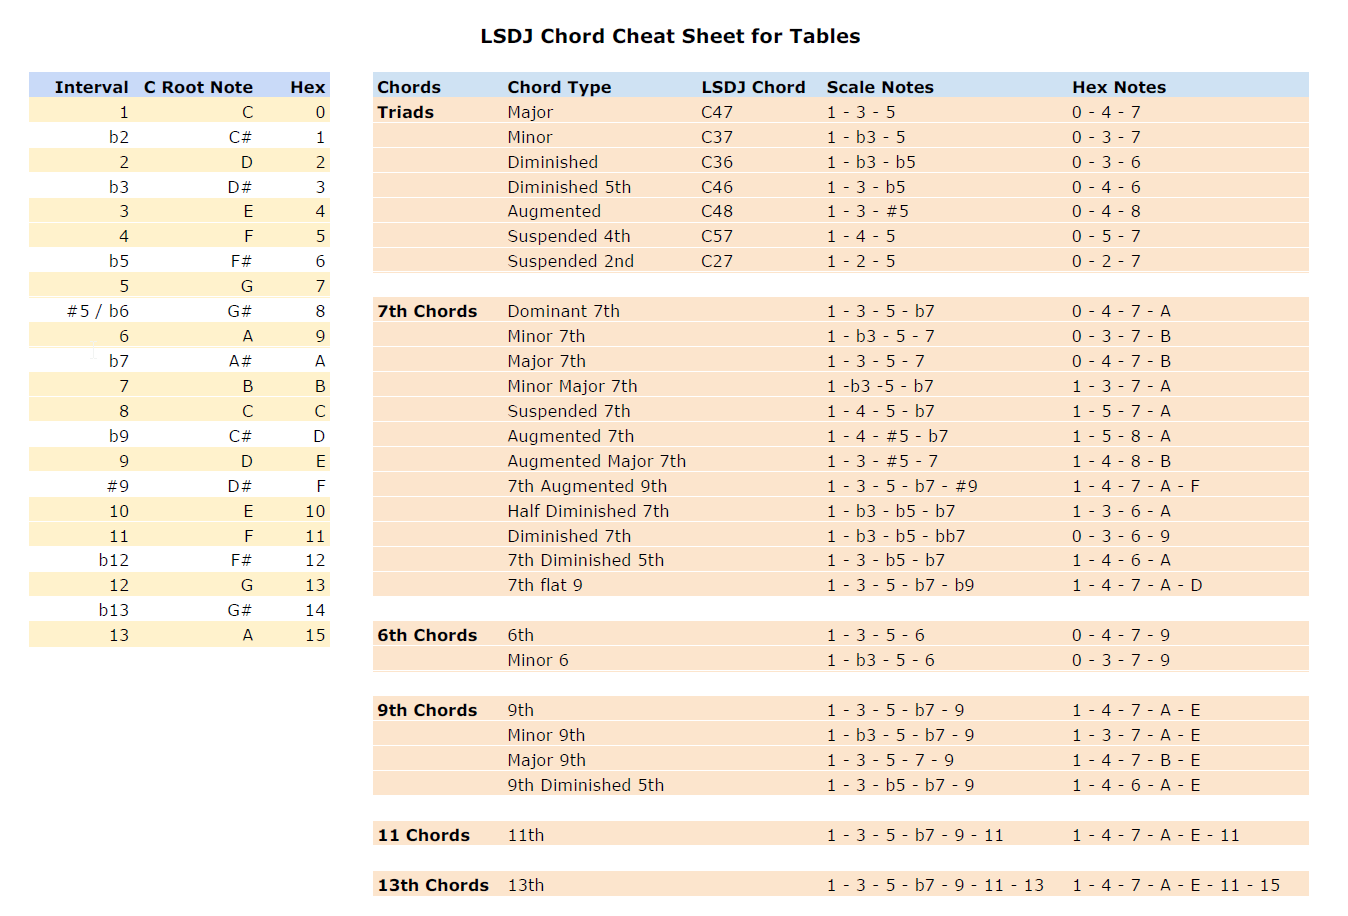
Also place down a few Chord commands a bit away from our Pitchbend commands, so that we can hear these chords without pitch sliding. C47 is equivalent to a Major Chord, and C37 a Minor Chord. More chords (sometimes called arpeggios/arps) can be made as seen in Figure 13 below.
To adjust the settings on the fly, press START then go back to the Instrument screen. Adjusting the PITCH parameter will affect how the Pitchbend command behaves, and adjusting CMD/RATE will slow down your Chord commands.
Quick tip: There's a list of the commands found in LSDj's Help screen, under the Project screen.
06. Let's make some noise in the NOISE CHANNEL!
On the same row your Pulse melody is create a new chain in the Noise (a.k.a. NOI) column. Move your cursor into the chain, add a new phrase (and inside it, a note using a new instrument). Make sure the instrument number is not the same as what you used for the pulse channel—we do not want to mess that up!
A good way to quickly bring up the closest available and free instrument/phrase/chain/etc. number is to press A twice. So do that now and press A+A on the instrument row to create a new instrument number there.

Hold A+LEFT/RIGHT while on the note column to listen to the range of available sounds. You should quickly notice how it is split into two types of sound: white noise where there is a 2 digit value (e.g. like notes 39, 2B and 3A in Figure 15) and metallic noise where it is an actual note pitch with an octave (i.e. note D 0 in Figure 15).
Using a single instrument for Kicks, Hihats and Snares will not usually bring the best results. It will give you more control and flexibility over each instrument's sound and is far less confusing if we make a separate instrument for each.
Quick tip: To prevent future confusion with your instruments, it is also extremely helpful to name your instruments from the start. You do not want to end up modifying an instrument wrongly and giving yourself double the work later. If you are lazy like me, just place the first letter for the instrument name (e.g. Bass, Lead, Kick, Snare, Hihat and so on.
Let's make them sound cool
This section should help you understand how to approach sound design in LSDj a bit better. We will continue to refer back to Figure 15 as we step through each noise instrument.
Naturally a Hihat (INSTR 02) should be short, snappy and high pitched. Setting the envelope to [75][00][--] sounds good for me, along with the R02 command.
Extra tip: Phrases may have different variations concerning pitch, sound and volume (e.g. notice how 3A is slightly quieter). With this instrument (INSTR 02) you may also create Cymbals by using a high metallic noise note like C 7!
The noise Kick (INSTR 03) has to be played loud so I set the envelope to [F4][00][--]. The longer release time allows this kick to make other sounds too because of the P command, which may be troublesome later. Though a shorter release takes the punch out of the kick, making it feel weak.
I have chosen note D 0 for my kick. It sounds punchy with the current P command next to it. Higher notes make it sound a bit like a kick+snare, and well personally, I find the metallic noise to carry more punch to noise kicks!
Snare (INSTR 04) by itself sounds good already with default [88][00][--] envelope, I just changed the volume to 9 (as shown in Figure 16) for more punch. To put more detail into it we are going to use this instrument to explain an important LSDj function: Tables.
07. "Well, well, well. How the turn-TABLES…"
Visit the Instrument screen and select a Table by pressing A+LEFT/RIGHT (for this guide, to Table 00). Then press SELECT+RIGHT to navigate to the Table screen. What you see looks like a rather big Phrase screen with two Command columns and a Transpose column. You are not wrong, though it is more of a mini-Phrase screen that runs at full speed or 1 row per tick.
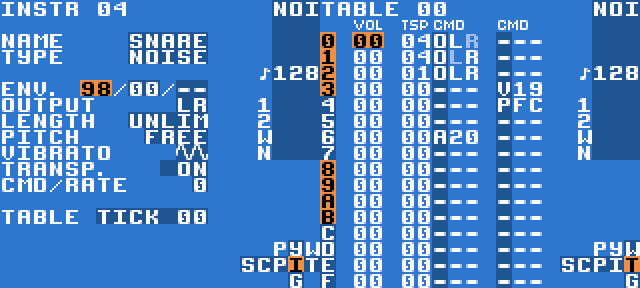
Wait, what are ticks? (The VOL column we will explain later. It is a neat side feature when using tables.) Ticks are a unit of speed in LSDj. The table sequence advances every 6 ticks by default, so during one Phrase row you may modify up to 2 parameters (i.e. those two CMD columns) at the same time 6 times! Tables offer plenty of ways to shape our instruments. The left side of Figure 16 shows one way we can shape the snare we created.
Breakdown of the snare table we created
We start with alternating pan commands, making our snare feel wide on the speakers, popping it out nicely.
The numbers in the Transpose column (TSP) will shift the pitch up/down per that particular step relative to the note played in the Phrase. I decided to raise it in the beginning, as this is how real snares sound like. It also makes it stand out more compared to other instruments.
The note played with the Vibrato command in this case will start going up in pitch, yet slow enough where we would not hear this vibrato coming back down.
The Pitchbend command bends the pitch downwards, further shaping our snare nicely while the Vibrato command is still actively going upwards. (Sidenote: One may think that these commands could be replaced with a single P01 or P02. The sound produced is similar but still different.)
We end our table using A20. This command will jump to the designated table. But there are only 1F tables. So A20 is effectively impossible and regarded as "no table". This will stop our active table from scrolling through commands, yet will allow each active effect (like Vibrato or Pitchbend) to continue playing.
If you have recreated the table in Figure 16, you should be able to hear how amazing tables are and that they can give instruments any detail and personality you want!
(Another sidenote: If we revisit the noise Kick instrument we made previously, we could pack PF0 into it's own table to add a small level of detail—but for our purposes it is good enough as it is.)
08. Working with Instruments
While recreating Figure 15, you may have wanted a quicker way to browse your instruments. Turns out, there is a way to quickly switch between your Snare, Hihat, Kick or Pulse instruments without leaving the Instrument screen. You do so by holding B+LEFT/RIGHT (the cursor can be anywhere). In the later versions of LSDj you may run into INSTR 40, an instrument you never initialized. This instrument is reserved for speech, and well, you do not need to worry about it for now.
You may have also been wondering if there is a fast way to hear how all of the instruments sound like together without having to listen to the whole song each time. So in the Song screen, just ensure that there is a row with more than a single chain placed (so one on PU1 and one on NOI, for our example). Pressing SELECT+START starts playback across all possible channels from anywhere that is not the Song screen! Refer back to the section Where you press START matters! for details about using START in LSDj.
09. Creating your first WAV KICK
Sampled or Synthesized?
The WAV channel offers us two types of instruments to work with, which we may select under TYPE on the Instrument screen: KIT or WAVE.
KIT allows us to play samples. We can not directly pitch them, yet is recommended for all kinds of drum samples and one-shot chants or drops.
WAVE allows us to freely create our own choices of melodic sound: be it Lead, Bass, Drums, and even funny dubstep sounds.
We will explain the KIT way first, then the WAVE way.
The easy drumKIT way (Sampled)
After setting a new instrument to KIT we will see that we get two kits on the Instrument screen. We also get an extra column on the Phrase screen, meaning we can play 2 different samples at once!
Placing notes on the Phrase screen will display the names of the samples from these kits. Setting both kits to the same type allows you to play the same sound twice and louder (which also probably triggers the DIST parameter, which we will explain more about later).
That's it for the easy drumKIT way!
The rest of the guide goes into detail about WAVE mode, and there is quite a lot of in-depth information as it is a most versatile and powerful function in LSDj.
From here on out, you are already prepared to make your own songs. Apart from understanding WAVE mode better, you should now have a solid understanding on creating songs with LSDj. So feel free to experiment and take it on when you feel ready.
Ride the WAVE! (Synthesized)
So let us make a WAV kick. Start by placing down a high octave note, and create a new instrument on the first row of a phrase. Hold SELECT+B, select the first 4 rows and copy them with B. Then hold SELECT and press A until the whole phrase is filled with 4/4 kick.
Playback will give you a squeaky saw wave. Let us assign the pitch slide to it…though not in the phrase, but assigned to the instrument in a Table.
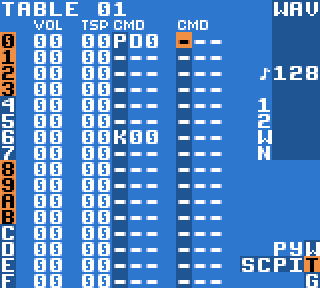
As seen in Figure 17, P command with value around D0 should do the trick. Notice that if we try to place notes in the lower octaves the pitch wraps back to the highest octave creating an unwanted sound. We can prevent that by setting PITCH to DRUM on the Instrument screen (with A+UP/DOWN). This way the pitch will stay at the shortest amount of time in it's highs, while slowing down close to it's lows. You should immediately hear the difference!
As we want to end our kick before any potential bass starts playing, we place a K00 around step 6 on the table to finish the kick quicker.
10. Sound synthesis
SYNTH vs WAVE, Sound synthesis part 1
Right now our Kick doesn't sound like a proper kick yet. The default Saw wave is not the best waveform for that. Considering how the WAV channel can have custom waveforms, it is certain that we can find a good one for our kick!
From the Instrument screen we navigate upwards, finding ourselves on the Synth screen. Pressing SELECT+RIGHT will show us the Wave screen. Both of these are great tools that deal with waveforms.
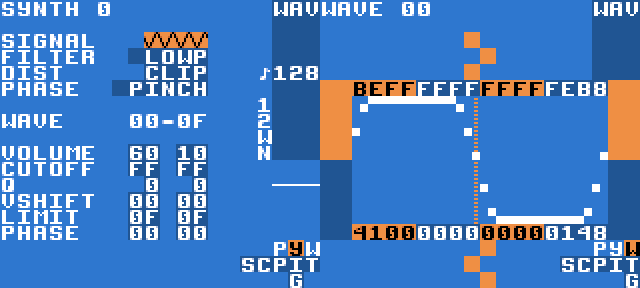
The Wave screen allows us to navigate around the whole collection of waves while holding B+D-pad (LSDj can have up to FF per song). You may also edit every wave manually in terms of shape on this screen.
The Synth screen groups those waves into it's own chunks of 16 (i.e. from 0 to F as shown in the wave row of the Wave screen) and tries to synthesize a sound between the beginning and end of the waveform. So the left side of each parameter represents the first frame of your instrument (or waveform), and the right side the last one. LSDj will fill the gap between these values automatically for us.
My settings on the Synth screen in Figure 18 shows what I do for a good kick. Provided you followed me step-by-step, you should be able to hear a good kick now. Fantastic! (We will go through the Synth screen parameters after Sound Synthesis part 2.)
WAV BASS, Sound synthesis part 2
Because the WAV channel can go much lower in pitch compared to the pulse channels, it is also the best channel for bass. So let us make a bass here!
Create a new instrument by pressing A+A on the instrument column. Place new notes between the kicks and sequence them out nicely, with at least 6 total notes in the phrase. Go to the Instrument screen of our bass and switch PLAYback mode to ONCE, LOOP or PINGPONG. With this we take full advantage of LSDj synth power!
If you created the WAV Kick from our previous steps, and while using the same synth number for the bass you should hear a sine wave and some modulation happening, going beyond the first wave that is used for Kick. With this you can play around with the SPEED and LENGTH settings. Since we use the same Synth settings for our Kick we should not change any settings here as we want to keep our Kick sound intact!
Quick tip: After finalizing your Bass instrument settings you can change the synth number to the next value to hear the default basic saw wave again as comparison.
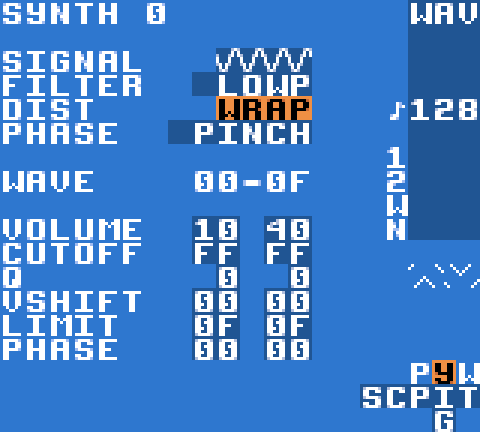
"What do the Synth screen parameters do?"
In short, the LSDj synth tries to simulate an analog synthesizer.
The Cutoff and Q settings are Filter elements, which our Signal (waveform/oscillator) goes through! (Don't worry about W.Fx in Signal for now.)
The Phase setting allows for easy PWM modulation, though the results depend on which Phase setting you have set. The Vshift setting moves the signal up, which is good for triggering the DIST. The Limit setting helps to precisely lower the actual volume of your instrument to fit the song.
You may experiment with the settings above while having your instrument in LOOP/PINGPONG. It helps to make sure it starts back again or reverses back to the beginning, and to ensure that you can hear the whole thing!
DIST (distortion) modes
The DIST mode decides what happens with our wave when it goes beyond it's max values.
CLIP will make the waveform stay at the max position (where it is). FOLD will make points of the waveform bounce back and "mirrors" it. WRAP will pass through or wrap around to appear on the opposite side while still moving onwards.
Extra tips while working with DIST
Adjusting the Q value won't make much difference to the sound until you adjust the Cutoff settings.11. "Can I make music now?"
Yes!
Some final notes
Here are some extra things to think about that you may find useful to know while working in LSDj.
Quick phrase cloning
To quickly create a copy of the phrase, hover your cursor over the chain number on the Song screen and hold SELECT, then press B and then A. The chain number should increase, and all the phrases inside should also have new numbers. Note that this replaces the chain number at the cursor, so it saves you time from having to manually copy it there. You can use this button combination to clone a lot of things.
Filling the gaps in the sequencer
You probably do not want your sounds to always start at the same time, and you may want to delay chains to start later. To keep the sequencer or song playback going it still has to be triggered from the start of the song. One way to solve this is to insert chains with empty phrases inside, like we have shown in Figure 21:
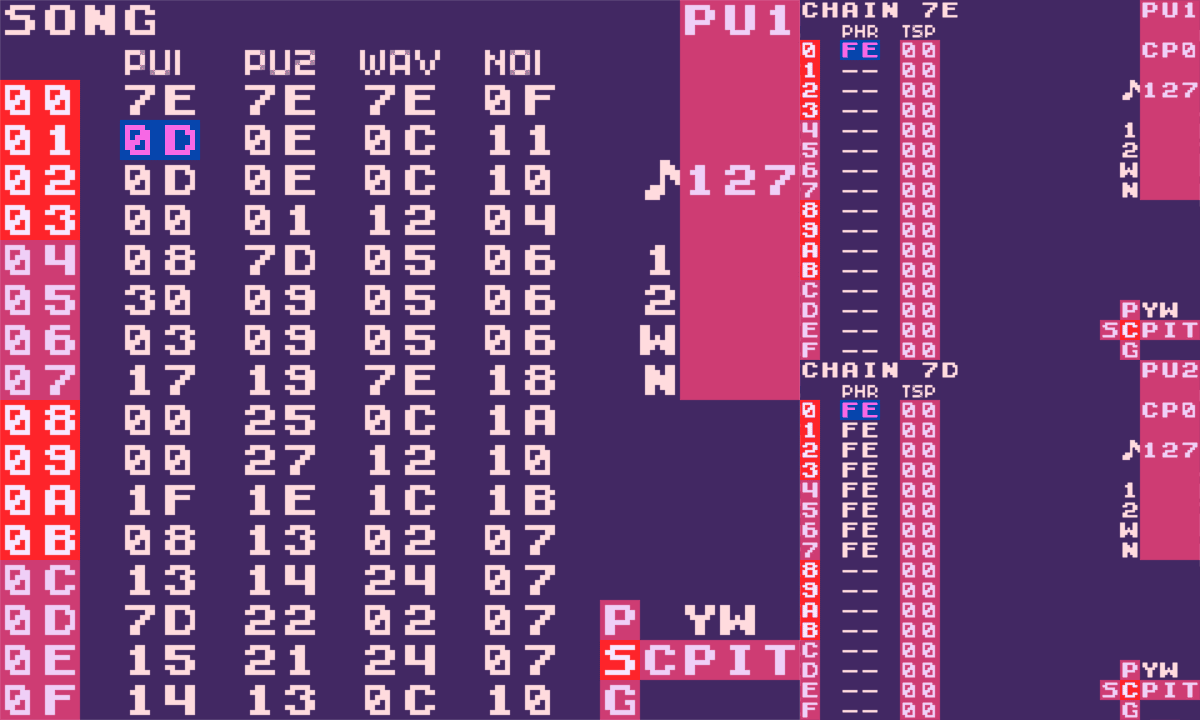
I chose the last available values so I both know where they are and also will not overwrite them by accident in future. 7F is used for chains, and FE is used for the empty phrases inside. Inside such dummy chains I place the same amount of phrases like in any other chains of the song, so there will not be any hiccups as everything will be in sync no matter where I press START.
Tempo control
If you want to make your song play faster or slower, then adjust the Tempo parameter at the top of the Project screen.
Notice how all your modulations go in sync together with a tempo increase/decrease: this means all the tables, arpeggios (or Chords) and retriggers (Retrig). Changing tempo can absolutely affect the sound design you made previously. It is usually fixed with a small adjustment, so it is not normally an issue. Just something which will happen that you need to be aware of.
Available space
Each project takes up a certain amount of blocks. If you are near your limit of free space, CLEAN SONG DATA from the Project screen will remove all chains and phrases that are not placed on the Song screen. That means any unused sequences will again return to you with A+A. And don't panic, it will not harm your composition as long as the chains/phrases have been placed somewhere on your Song screen.
"What about older LSDj tutorials and old LSDj versions?"
You may find some LSDj tips & tricks written years ago (LSDj is over 20 years old!) where things look different in terms of interface or function. As an example we can simply compare the latest current stable release (v8.5.1) and notice how notes placed in the noise channel follow a different pattern. Or how the volume envelope (previously and confusingly called "ADSR") could only go up to a certain level. Even older versions had a completely different Synth screen. There are many more such differences in previous versions.
I believe old tutorials can still be useful today, but you may sometimes have to look for a way to translate or adapt some of the tricks from any older versions. In some cases things have been made easier in the later versions—it goes both ways!
12. Where to learn more
On the main LSDj site
You'll find the LSDj manual in PDF format. The manual describes all the functions inside LSDj, and that includes ones we skipped to keep this guide from becoming overwhelming. Now that you have a better grasp of how LSDj works, it will be easier (and recommended) to learn the rest from the manual.
Other guides/videos
There are plenty of advanced guides/videos explaining fancy techniques that you might find super helpful.
Chiptune communities
Also feel free to join Chiptune communities like the ABOC, pUwUlsewave and GeekbeatRadio in order to meet and talk with other LSDj folk!
13. Credits
INFU
Yo, that's me! Wrote and planned whole guide!
Torsten Hansson
Incredible guide rewording/redesign that made it look as awesome as it does now!
probskay
Going through the guide, learning trackers for the first time, and provided tons of feedback!
Johan Kotlinski
Developing LSDj, updating it while keeping in mind both advanced and new users!
All various volunteers from pUwUlsewave, ABOC
for their kind words and feedback!
14. License (CC-BY-NC 4.0)
Shield: ![]()
This work is licensed under a Creative Commons Attribution-NonCommercial 4.0 International License.
